Attacks
KSTET exploitation: DLL sideloading exploit

VP of Hacking
Updated
Jul 2, 2020
10 min
This is an alternate take of the article of exploiting the KSTET command of Vulnserver, a VbD (Vulnerable-by-Design) application in which you can practice Windows exploit development.
The KSTET exploitation is really interesting because after controlling the instruction pointer EIP, we are left with little space to work on.
With that kind of restrictions, we must be very creative in order to achieve a working exploit that triggers something complex like a reverse shell. For example, we also had space restrictions in the exploitation of the GTER command, and we used an Egghunter and reused part of the WinSock stack to create a custom reverse shellcode.
In the KSTET command article, we used a technique called socket reusing. In this post we will squeeze our space restriction a little more and use a different exploitation technique.
I will shamelessly leave part of the article for the KSTET exploitation and only divert it when needed.
KSTET take 2!
Fingerprinting KSTET
Enumerating and fingerprinting is the most important step when verifying the security of any target.
Let’s check how the KSTET command behaves:
Well, easy enough. Now we are going to do the same but we will check it under our debugger. I will use Immunity Debugger.
The first step is to identify where the KSTET command is processed.
We can do that by right-clicking, then Search for → All referenced text strings, right-click again, then Search for text and type KSTET. Make sure that Entire scope is selected. Now, select the match on where KSTET string is presented and set a breakpoint:
With that in place, we can start our connection to Vulnserver again and see what happens under the hood:

As you can see, several things are happening:
Our breakpoint was reached when we typed
KSTET hello.Several external functions are called, including
strncpy,mallocandmemset.There is one function that stands out:
strcpy, which will copy anything that is on one buffer to another, without checking buffer boundaries.
Let’s see what happens when we issue something larger than a hello to the KSTET command:

Uggh! With a very short string, Vulnserver crashed, and we overwrote EIP, which means that we can control the execution flow of the application.
With that, we can start creating our proof-of-concept exploit:
And check it:
That’s good news. However, the injected string was really short, and maybe we’d have a narrow buffer space to work on.
Checking available buffer space
If we check the state of the application after the crash, we will see this:

In the dump window (bottom left), we see our injected buffer. In the PoC, we sent 200 A chars, but as you can see here, the total amount of injected bytes, including the word KSTET itself, is only 0x63 or 99 bytes.
In the GTER command exploitation, we had 140+ bytes to work on, and we used two techniques: WinSocket stack reusing and an egghunter.
The first one is not viable because although we reduced the shellcode length to the half, the resultant shellcode was 128 bytes.
We could use an egghunter here, but that wouldn’t be much fun. Why make it easy if we can do it the hard way?
OK, let’s start by checking the offset of the crash by creating a cyclic pattern of 100 characters using pattern_create.rb tool from Metasploit:
And update our exploit:
And check it:

As you can see, EIP was overwritten with 63413363. We can check the offset of that bytes on our cyclic pattern to get the offset on where EIP gets overwritten:
Now, check that offset by updating our exploit:
And run it:
Wonderful! We know exactly how to overwrite EIP to get control over the execution flow.
Exploiting
As with the TRUN and GTER commands, we have a direct EIP overwrite here, and the ESP register points directly to our controlled buffer. That means that we can look for a JMP ESP instruction and overwrite EIP with its address to take control of the execution flow. We can do that using mona.py plugin:
This would tell mona to look for instructions that can be used to jump to ESP (jmp -r esp), excluding pointers with null bytes (-cp nonull) and omitting OS DLLs (-o). The result is the following:

We can choose any of those 9 pointers. I’ll choose the one at 625011BB.
Now, we can update the exploit with that address:
And check it:

Great! However, as you can see, we landed on a 20 bytes buffer where we put the C chars, but we have 66 bytes above on the buffer of the A chars.
With a short jump backward, we can easily jump to that place:

The resultant bytes were EB B5. We can update our exploit with that:
And check it:

But again, we were brutally reminded that we have a narrow buffer space to work on.
To work around that constraint, we will use this time a sideloading technique for injecting the needed payload from an adjacent computer.
Dynamic linking
Commonly, when creating an exploit, you inject the required payload and modify the instruction pointer EIP to point to your code. Then, the victim application will execute the code you injected, which can be a simple MessageBox or anything complex like a TCP shell.
That payload, or shellcode, can only use calls to the OS API of modules that the victim application has already loaded in memory.
The OS API is distributed on reusable files that can be linked to any application. In Windows, they are known as Dynamic-Link Library or DLL files. Commonly, an application will load executable dependencies at run-time using the OS dynamic linker.
We can see the DLL files loaded using several ways. On Vulnserver, we will use our debugger again:
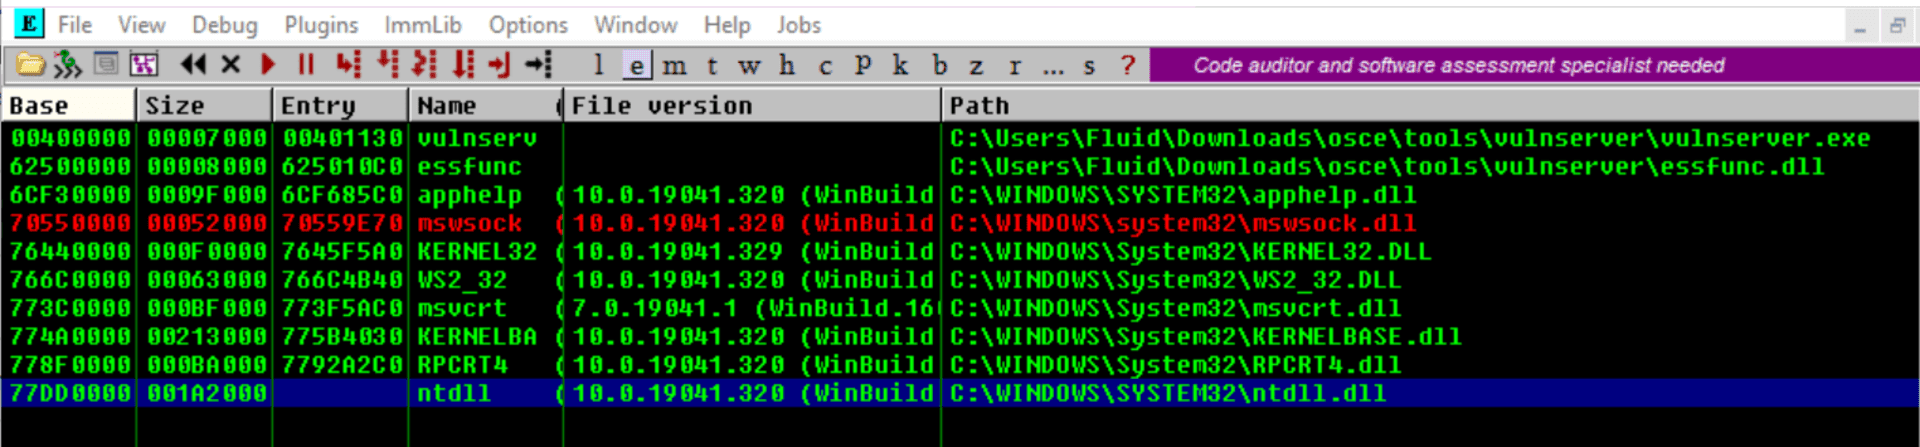
That means that Vulnserver (and therefore, our shellcode) can execute any function included on any of those modules.
However, there is a way for an application to include new libraries when it’s already running: Dynamic Linking. On Windows, it can be done with any of the LibraryLoad functions family. Those functions are located on KERNEL32.DLL, which is the module that exposes most of the Win32 base API; therefore, virtually any Windows application has it loaded at run-time.
As the injected shellcode is also part of the application, we can dynamically link any available DLL.
With that ultra-simplified introduction to dynamic linking, it’s time to write some Assembler!
Dynamic-included payload
The first thing to do is to locate the address of LoadLibraryA on our system. We can do that using the arwin tool:
NOTE: I’m using Windows 10 Pro 20H2 at the moment of this writing. As ASLR is enabled by default, the LoadLibraryA address will change on every reboot.
We also need to know the LoadLibraryA parameters:
Taken from https://docs.microsoft.com/en-us/windows/win32/api/libloaderapi/nf-libloaderapi-loadlibrarya.
Easy! The lpLibFileName is a string with the location of the DLL file to be included. To our advantage, the location can be a Universal Naming Convention (UNC) path in the form \\server\share\file.dll.
In Windows, that path would be resolved using the SMB protocol. That means that we must expose that file using an SMB server, but we will get to that later. For now, we can predict that the UNC path of our payload will be at \\attacker_ip\share\shell.dll; in my case, it would be \\192.168.0.18\X\pwn.dll.
To call LoadLibraryA on an x86 architecture, we must push into the stack the lpLibFileName value, which is a pointer to the \\192.168.0.18\X\pwn.dll string. As x86 is a 32 bits architecture, we must push exactly 4 bytes each time into the stack, and as we are pushing data into the stack, it must be in reverse order. So, we need to convert \\192.168.0.18\X\pwn.dll to hex, split it in chunks of 4 bytes, pad as needed and reverse. This can be done with:
With the required information, we can now write the call to LoadLibraryA:
We can compile that using nasm:
And obtain the shellcode using this:
Let’s update our exploit with that:
And check it:

Great! The LoadLibraryA function is now ready.
Show time
Now that we have everything set, we must now create a shellcode on a DLL file and share it on an SMB server.
Luckily for us, msfvenom can create shellcodes in DLL format. Let’s do that:
We also must serve that pwn.dll file on an SMB share called X. We can use Impacket’s smbserver.py to do that:
This will create a new anonymous SMB server, will share the current directory ., using a share called X. The -smb2support parameter is needed because Windows 10 will refuse to connect to SMB servers using the SMBv1 protocol.
We are now ready. We can check our exploit:

Yes! We got a shell! You can see how the victim is self-hacking by retrieving the payload from our attacking machine!
You can also see that pwn.dll is now part of the vulnserver.exe executable modules:

Crazy, huh? You can download the final exploit here.
Conclusion
This was a very fun way of exploiting Vulnserver. Remember that this technique only works if the attacking machine is adjacent to the victim machine and there are no network restrictions between them.

Get started with Fluid Attacks' PTaaS right now
Other posts